Design Course
Bouncing Ball Animation
Level: Introductory
by
Planning for Animation
Before you get down to animating, it is important to take some time planning your animation. This is a good time to look at your research, reference material and observations made from them closely. In our case, take a look at the reference video of the basketball. Notice the ‘Timing’ of the bounces of the ball. Duration between each successive bounce is lesser than the previous one.
Simple as this exercise may seem, Timing is one of the important principles of animation.
For more details on Timing you can check the below module on Principles of Animation:
(http://www.dsource.in/course/principles-animation/timing)
a. Identifying Keys and Timing:
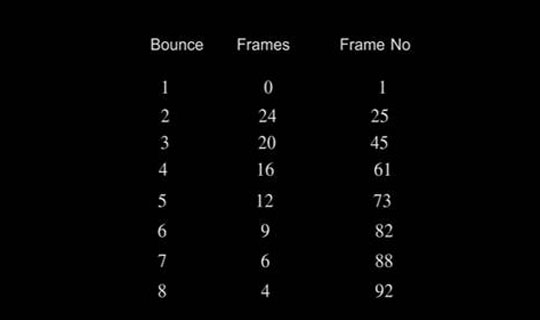
If you observe the reference carefully, the timing between the first two bounces is around a second. In PAL, this is 25 frames. Accordingly, you can plan the number of frames between each successive bounce. Based on this, you will be able to calculate the frame of animation at which each bounce occurs. Identifying these frames where the ball bounces are the ‘key’ to good animation. Hence they are called as Keyframes. The other frames are a simple interpolation of the animated object or character from one keyframe to another.
b. Planning - Spreadsheets and Exposure sheets:
You can use a simple table (or a spreadsheet) to plan your animation. Here, in the below table you can see how we have planned the timing of the bounces for our animation.
For more complicated animation, you can use exposure sheets to plan out your animation in more detail. If you were doing 2D animation, this becomes even more important as you need to draw every keyframe and not just move objects around as required.
For more details on Storyboard Template you can check the below module:
(http://www.dsource.in/course/storyboard-and-animatic-animation/storyboard-animation/basic-storyboard-template)
Understanding exposure sheets will help you a lot. Especially if, you are trying to combine 3D with some 2D animation.
Now you are truly ready to animate!